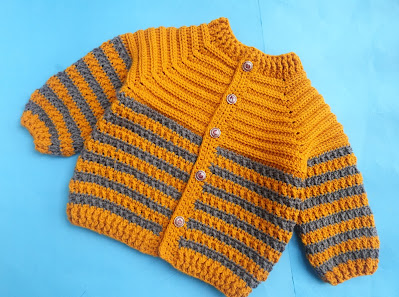

✨ Features:
-
Handcrafted with love using soft, baby-friendly yarn
-
Warm and breathable – ideal for autumn and winter
-
Adorable button-up front for easy dressing
-
Available in multiple sizes (0-3 months, 3-6 months, etc.)
Items to be need:
Wool: 400-450 Grams #4 Medium Weight/DK weight 4 Ply (16-20 = 4 inches)
Hook size: 4mm (G-6) & 3.5 mm (E-4)
Baby Cardigan Size: 4-6 years
Pattern Gauge: 4 double crochet stitches x 2 Rows = 1 inch with Hook size 4mm (G-6)
Lenght: cardigan jacket length from top to bottom: 16- 17inches/41- 43 cm
chest size: 26-27 inches/66-68 cm
sleeve length from under arm to cuffs: 11-12 inches/30- 32 cm
c. Crochet
ch. Chain
sc Single crochet
hdc Half double crochet
dc. Double crochet
sts. Stitches
st. Stitch
sl st. Slip stitches
sc tog Single crochet 2 together
dc tog Double crochet 2 together
FP dc Front post double crochet
Bp dc Back post double crochet
follow size chart for changing Cardigan jacket:
0-3 months: chains 48+1, divide for(8 front/ 8 shoulder/ 16 back/ 8 shoulder/ 8 front)
6-12 months: chains 52+1, divide for(8 front/ 9 shoulder/ 18 back/ 9 shoulder/ 8 front)
1-2 years: chains 58+1, divide for(9 front/ 10 shoulder/ 20 back/ 10 shoulder/ 9 front)
2-4 years: chains 62+1, divide for(9 front/ 12 shoulder/ 20 back/ 12 shoulder/ 9 front)
4-6 years: chains 66+1, divide for(9 front/ 13 shoulder/ 22 back/ 13 shoulder/ 9 front)
Note: if you have any problem in the neck line width or length so,you can change hook sizes.
2nd way for changing sizes add or less the rows of chest or change hook sizes.
Start Pattern Cardigan Coat Jacket 4-6 years:
Color A:
Chains 66 +1,
Row1- make hdc into 2nd ch from the hook, hdc in
each ch across, turn. (hdc 66)
Row2- (Front) make ch1 don’t count, hdc in each 9 sts into back
loop, 3 hdc into next st
back loop, (shoulder)hdc in each next 12 sts back loop, 3 hdc
into next st back loop,
(Back) hdc
in each next 20 sts back loop,3 hdc into next st back loop,
(Shoulder), hdc in each next 12 sts
back loop, 3 hdc into next st back loop, (Front), hdc in each next
9 sts back loop, turn work.
Row3- (front), ch1 don’t count, hdc in each st across only into
back loop to next middle st of
corner, make 3hdc into corner middle St back loop,
(shoulder), hdc in each st into back loop
across to next middle st of corner, make 3 hdc into corner
middle st back loop,(Back)
hdc in each st into back loop across to next middle of corner, make
3hdc into corner middle
st back loop, (shoulder) hdc in each st into back loop across to next
middle st of corner,
Make 3hdc into corner middle st back loop,(Front), hdc in each st across till end.
Turn work
Row4- 17: Repeat and follow Increasing Row 3.
Measurement from shoulder which is 7 inches/ 17 cm
Measurement chest size which is 13 inches front and 13 inches
back= 26 inches
Next row join front to back panel.
Color B:
Row18- ch1 not count, hdc into back loop in each 25 sts across
to next corner, make hdc into
middle st of corner, leave/skip sts for Sleeve, make
hdc into next middle of corner st,
then make hdc into back loop in each st across in back panel, then make
1hdc into
next middle st in corner, leave/skip sts for 2nd sleeve, make 1 hdc into
next middle
st in corner, then make hdc into
back loop across the 2nd front, turn. (106
stitches)
Jacket Body:
Right side facing of jacket,
Row1- ch1 don’t count, hdc into same
st, *make FP dc into next st, 1hdc into next st*,
Repeat and follow form * to * across,
hdc into ch1, turn. (we have 107 sts)
Color A:
Row2- ch1 don’t count hdc in each st
across, turn. (107 hdc)
Row3- ch1 don’t count, hdc into same
st, *make FP dc into next st, 1hdc into next st*,
Repeat and follow form * to * across,
hdc into ch1, turn. (we have 107 sts)
Row4- 21: Repeat and follow pattern
Row2 & Row 3 as we have done in sweater body.
Changing color after every 2 Rounds.
Measurement from under arm is 8.5
inches/ 21-22 cm
Make Ribbing Border of Jacket:
Color A:
Change hook size 3.5 mm,
Row1- ch1 don’t count, hdc in each st
across, turn.
Row2- ch1 don’t count, hdc into same st, *make Front Post dc
into next st, Back Post
Dc into next st*, repeat from * to * across till end, make hdc
into last st, turn.
Row3- ch1 don’t count, make hdc into same st, *make FP into
Front post, BP into
Back Post*, repeat from * to * across, hdc into last st, turn.
Row4- Repeat and follow Row 3 of Ribbing. Fasten off
Measurement from shoulder which is 16- 17inches/41- 43 cm
Make Right Front Button Band:
Color A:
Row1- with hook size 4mm, ch1, make hdc 52 in each st edging
front across from down
to top, turn. (hdc 50)
Row2-3: ch1 not count, hdc in each st across till end.(hdc 50)
Make Left Front Button Band:
Color A:
Row1- ch1, make hdc 52 in each st edging front across from top
to down, turn. (hdc 50)
Row2- ch1 not count, hdc in each next 8 sts, *make ch1, skip
next st for button hole,
Make hdc in each next 9 sts*, repeat from * to * across till
end, at the end make 1 hdc into
last st, Turn. We have 5 buttonholes in the row.
Row3- ch1 not count, make hdc in each st across till end, turn.
(hdc 50). Fasten off
Make sleeves:
Color B:
Row1- join yarn under arm ch, ch1 don’t count, make hdc 2
together, Make 1 hdc into
next corner st, then make hdc into back loop in each st around
armhole, at the end of corner
make hdc 2 together, Slip st into 1st hdc to join,
Turn work. (hdc 46)
Row2- ch1 don’t count,
hdc into same st, *make FP dc into next st, 1hdc into next st*,
Repeat and follow form * to * across, slip
st into 1st hdc to join, turn work (46 sts)
Color A:
Row3- ch1 don’t count, hdc in each st
around, slip st into 1st hdc to join, turn work. (hdc 46)
Row4- ch1 don’t count,
hdc into same st, *make FP dc into next st, 1hdc into next st*,
Repeat and follow form * to * across, slip
st into 1st hdc to join, turn work (46 sts)
Row5-22: Repeat and follow pattern
Row3 & Row4 of sleeves.
Changing color after every 2 Rounds.
Make Ribbing Border Sleeves:
Color A:
Change hook size 3.5 mm,
Row1- ch1 don’t count, *hdc 2
together, 1 hdc in next st*, Repeat from * to * around,
Slip st into 1st st to
join.
Row2- ch1 don’t count, hdc into same st, *make Front Post dc
into next st, Back Post
Dc into next st*, repeat from * to * around, slip st into 1st
hdc to join.
Row3- ch1 don’t count, make hdc into same st, *make FP into
Front post, BP into
Back Post*, repeat from * to * around, slip st. fasten off
Make Ribbing Border Neckline:
Color A:
Row1- join yarn into neck corner st right side facing, make hdc
into same st, *make
Front Post dc into next st, Back Post d c into next st*, repeat
from * to * across,
Hdc into last st, turn.
Row2- ch1 don’t count, make hdc into same st, *make FP into
Front post, BP into
Back Post*, repeat from * to * across, hdc into last st, turn
work.
Row3- ch1 don’t count, make hdc into same st, *make FP into
Front post, BP into
Back Post*, repeat from * to * across, hdc into last st, turn
work. Fasten off
Finishing: sew buttons on band and weave all ends. Fasten off
baby cardigan jacket video tutorial hindi/urdu
i hope you would like more free pattern for


